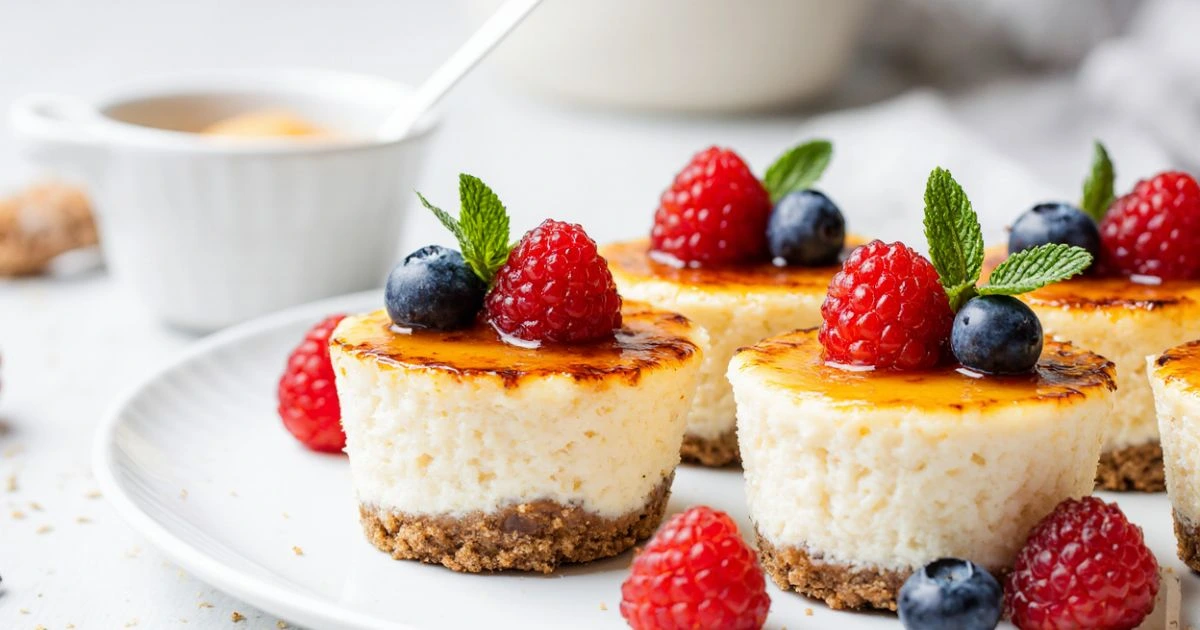
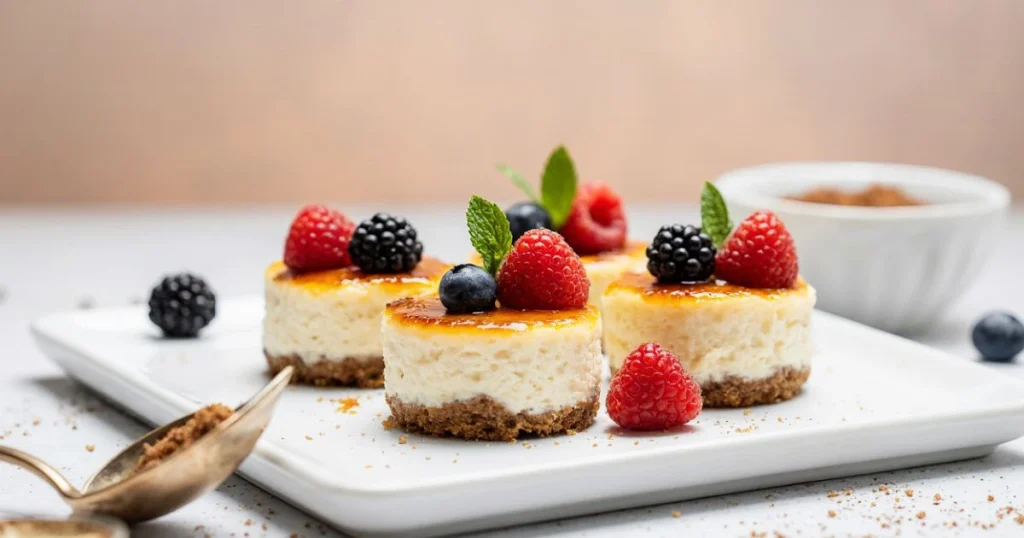
Mini Crème Brûlée Cheesecakes: The Perfect Bite-Sized Fusion Dessert
If you love decadent desserts that combine rich flavors and elegant presentation, mini crème brûlée cheesecakes might just become your new favorite. These delightful treats marry the creamy, tangy texture of cheesecake with the crisp, caramelized sugar topping of classic crème brûlée, all in a convenient bite-sized form. Perfect for parties, special occasions, or a luxurious everyday indulgence, these mini cheesecakes offer the best of both worlds.
What makes this dessert so irresistible is not just its taste, but the artistry involved in the brûlée topping. Achieving that signature crispy caramelized sugar crust requires either a kitchen torch or a quick broil under the oven’s heat. If you’re unfamiliar with how to use a torch safely, this guide offers excellent tips for beginners. On the other hand, understanding the science behind a perfectly textured baked cheesecake can elevate your baking skills, so I recommend reading this detailed article before you start.
What Makes Mini Crème Brûlée Cheesecakes So Special?
To truly appreciate these mini delights, let’s break down their essential components:
Crust
- Typically made with graham cracker crumbs or digestive biscuits.
- Mixed with melted butter for a buttery, crisp base.
- Alternative crusts like Oreo crumbs or almond flour offer exciting flavor twists.
Filling
- Combines cream cheese, sour cream, eggs, and sugar.
- The blend ensures a creamy, dense texture with a subtle tang.
- Flavor is enhanced with vanilla extract or other extracts such as almond or hazelnut.
Brûlée Topping
- The signature caramelized sugar layer is created by sprinkling granulated sugar on top and caramelizing it.
- This creates a satisfying contrast between the smooth cheesecake and crunchy top.
Step-by-Step Recipe Guide to Mini Crème Brûlée Cheesecakes
Creating mini crème brûlée cheesecakes at home is easier than you think. Follow this detailed recipe guide for a rich, creamy cheesecake base topped with the iconic caramelized sugar crust.
Ingredients You’ll Need
- Crust:
- 1 cup graham cracker crumbs (or digestive biscuits)
- 4 tablespoons melted butter
- Filling:
- 16 oz cream cheese, softened to room temperature
- ¾ cup granulated sugar
- 2 large eggs
- 1 teaspoon vanilla extract
- ¼ cup sour cream
- Topping:
- Granulated sugar (for caramelizing)
Instructions
- Preheat the Oven
Set your oven to 325°F (160°C) to prepare for baking your cheesecakes. - Prepare the Crust
In a medium bowl, combine the graham cracker crumbs and melted butter. Stir until the mixture resembles wet sand.
Using a spoon or your fingers, press this mixture firmly into the bottom of each cup of a standard 12-cup muffin tin lined with paper liners. This creates a buttery, crunchy base for your mini cheesecakes. - Make the Filling
In a large mixing bowl, beat the softened cream cheese and sugar together until smooth and creamy using an electric mixer. This step is crucial for a lump-free filling.
Add the eggs one at a time, mixing well after each addition to fully incorporate.
Mix in the vanilla extract and sour cream until everything is well combined and the batter is silky smooth. - Fill the Muffin Cups
Pour the cheesecake batter evenly over the prepared crusts, filling each cup about three-quarters full. Be careful not to overfill to prevent spilling during baking. - Bake the Cheesecakes
Place the muffin tin in the oven and bake for about 20 minutes. The cheesecakes are done when the edges are set but the centers still have a slight wobble — this ensures a creamy texture once chilled. - Cool and Chill
Remove the cheesecakes from the oven and let them cool to room temperature. Then transfer them to the refrigerator and chill for at least 4 hours, or preferably overnight. This step helps the filling to fully set. - Caramelize the Sugar Topping
Before serving, sprinkle a thin, even layer of granulated sugar over each cheesecake. Using a kitchen torch, carefully caramelize the sugar by moving the flame back and forth until the sugar melts and turns golden brown.
Don’t have a torch? Place the cheesecakes under the oven broiler for 1-2 minutes, watching closely to avoid burning.
Final Tips
- For best results, ensure your cream cheese is at room temperature before mixing to avoid lumps.
- Chill cheesecakes overnight for a firmer texture and richer flavor.
- Experiment with adding fruit purees or flavored extracts to the filling for unique variations.
Enjoy your elegant, perfectly textured mini crème brûlée cheesecakes — the ideal bite-sized dessert for any occasion!
Tips for Perfect Mini Crème Brûlée Cheesecakes Every Time
Mastering mini crème brûlée cheesecakes is all about attention to detail. Here are some essential tips to help you achieve flawless results every time:
- Use cream cheese at room temperature for a smooth, lump-free filling. Cold cream cheese can cause uneven mixing.
- Avoid overbaking to prevent cracks and a dry texture. The center should still be slightly jiggly when you remove them from the oven.
- Press the crust mixture firmly into the muffin cups to create a sturdy base that won’t crumble when serving.
- Chill the cheesecakes for at least 4 hours, preferably overnight. This helps the filling set and enhances the flavors.
- For the signature brûlée topping, use a kitchen torch for even caramelization. If you don’t have one, use your oven’s broiler but watch carefully to avoid burning.
- Don’t skip the caramelized sugar step—it provides a delightful contrast in texture and taste.
Follow these tips for perfectly creamy, crisp, and delicious mini cheesecakes every time!
Flavor Variations to Try
Make your mini crème brûlée cheesecakes uniquely yours with these easy flavor ideas:
- Fruit Infusions: Swirl in purees like raspberry, mango, or passionfruit for a fresh, vibrant taste.
- Chocolate Layer: Add a thin layer of rich chocolate ganache between the crust and filling for extra indulgence.
- Flavor Extracts: Experiment with almond, hazelnut, or coconut extracts to complement the creamy base.
- Toppings: Garnish with fresh berries, edible flowers, or a sprinkle of sea salt on the caramelized sugar for a gourmet finish.
These twists keep the classic appeal while adding exciting new dimensions to your bite-sized dessert.
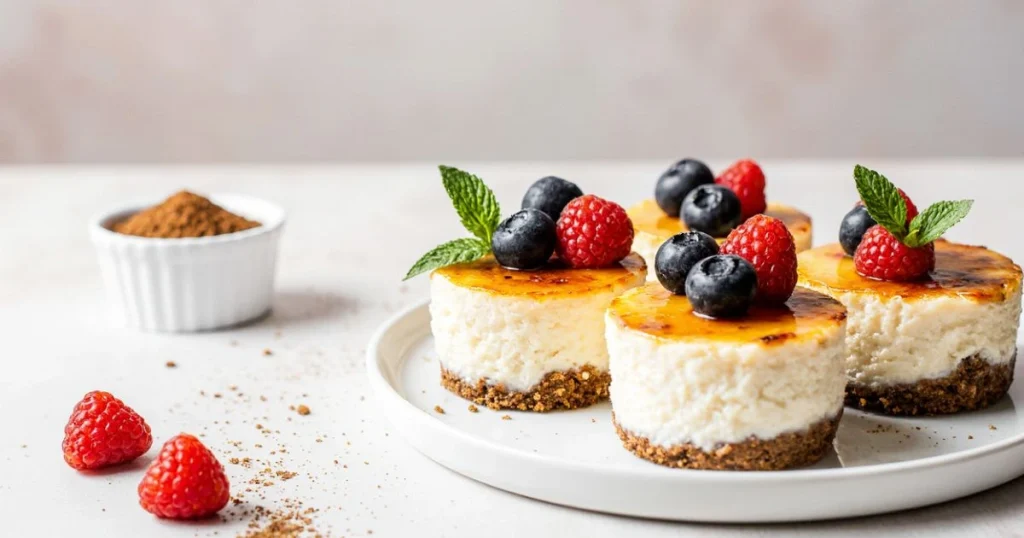
Serving Suggestions for Elegant Presentation
Mini crème brûlée cheesecakes aren’t just delicious—they’re also a stunning centerpiece for any dessert table. Here are some creative ideas to serve and impress:
- Elegant Plating: Arrange the mini cheesecakes on a beautiful dessert platter or tiered stand. Garnish each with fresh berries like raspberries, blueberries, or sliced strawberries to add color and a burst of natural sweetness.
- Fresh Herbs: Add sprigs of mint or edible flowers alongside the cheesecakes for a pop of green and an aromatic touch.
- Temperature Matters: Serve the cheesecakes at room temperature to enhance the creamy texture and maximize flavor contrast with the crunchy caramelized sugar topping.
- Pair with Drinks: Complement the dessert with a glass of sweet dessert wine such as Moscato, late-harvest Riesling, or even a sparkling rosé. For beginner-friendly pairing tips, check out this wine and dessert pairing guide.
- Accompaniments: Offer a side of lightly whipped cream or a drizzle of berry coulis for extra indulgence.
With these simple touches, your mini cheesecakes will elevate any occasion, from casual get-togethers to formal celebrations.
Storage and Make-Ahead Tips
Mini crème brûlée cheesecakes are perfect for preparing ahead, making them ideal for busy hosts or special occasions. Here’s how to store and keep them fresh:
- Refrigeration: Store cheesecakes in an airtight container in the refrigerator for up to 3 days. This helps maintain their creamy texture and prevents them from absorbing other odors.
- Freezing: For longer storage, freeze cheesecakes without the caramelized brûlée topping. Wrap each cheesecake individually in plastic wrap and place in a freezer-safe container for up to 1 month.
- Reapplying the Topping: When ready to serve, thaw cheesecakes overnight in the refrigerator. Sprinkle granulated sugar on top and use a kitchen torch or broiler to caramelize the sugar fresh for that signature crisp texture.
- Make-Ahead Advantage: Baking and chilling the cheesecakes a day ahead allows flavors to develop fully and saves you time on the day of your event.
Following these tips ensures your mini cheesecakes stay fresh and delicious whenever you want to enjoy them.
Nutritional Information & Healthier Substitutions
A typical mini cheesecake contains around 250-300 calories per serving, depending on crust and topping. For a lighter version:
- Substitute Greek yogurt for sour cream to reduce fat content.
- Use low-fat cream cheese or blend with cottage cheese.
- Opt for natural sweeteners or reduce sugar slightly.
Frequently Asked Questions (FAQs)
Can I make these without a kitchen torch?
Yes! Use your oven’s broiler to caramelize the sugar on top. Watch carefully to avoid burning.
How do I prevent cracks in the cheesecake?
Avoid overmixing the batter and overbaking. Use an oven thermometer to maintain a consistent temperature.
Can I use a different crust?
Definitely. Try Oreo crumbs, almond flour, or even crushed pretzels for unique flavor profiles.
How can I tell when the cheesecakes are done?
The centers should be set but slightly wobbly when you gently shake the pan.
Conclusion
Mini crème brûlée cheesecakes offer an elegant and indulgent dessert option that combines the best of two iconic sweets. Their creamy filling, crisp caramelized topping, and customizable flavors make them perfect for impressing guests or simply treating yourself. With the recipe, tips, and variations provided, you’re all set to create these stunning bite-sized desserts that will delight any palate.
If you like more delicious dessert recipes.discover our new recipe for Red Velvet Cake